Have you ever wanted to apply for something online - perhaps a scholarship - and had to fill a form giving some basic information before you could apply? Or maybe, you have purchased a product online, and you got directed to a checkout page where you had to fill a form giving some essential information and wondered how you could replicate something similar as a beginner web developer. Then, this article is for you.
In this article, you will learn:
- What HTML forms are.
- Various input types and options in an HTML form.
- Some elements for creating HTML forms.
- Basic Syntaxes for creating HTML forms.
What Are HTML Forms?
HTML forms are essentially valuable for collecting user input and feedback, after which such input/feedback is sent to a server where it is processed. HTML forms are a great way for you to exchange information and interact with users on your platform. So, if you ever find yourself in a situation where you have to get some sort of information from your users, then HTML forms should be your go-to.
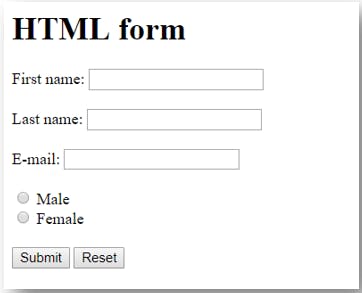
Below is an image of a simple HTML form to give you an overview of how HTML forms look.

Input Types In An HTML Forms
When creating an HTML form, there are various input types available for your use, and your choice of input type will be dependent on the kind of response you expect from the users.
For instance, if you are creating a survey and you want to collect the gender of your respondents since a person can only be of one gender, you would need a "radio button" input type. Radio buttons allow users to select one option out of various listed options.
<input type=”text”>
Displays a single-line text input field.
It is useful when you are collecting text inputs like names from your users.
<input type=”radio">
Displays a radio button (for selecting one of many choices)
Use radio buttons when you want your users to choose one of many choices.
<input type=”checkbox”>
Displays a checkbox(for selecting zero or more of many choices)
Checkboxes should be used when you need your users to select zero or more of available choices.
<input type=”submit”>
Displays a submit button(for submitting the form).
The submit input type is a form of a button that signifies that a user is done filling all necessary fields and saves the information to the database.
<input type=”button”>
Displays a clickable button.
other input types include:
<input type="color">
<input type="date">
<input type="datetime-local">
<input type="email">
<input type="file">
<input type="hidden">
<input type="image">
<input type="month">
<input type="number">
<input type="password">
<input type="range">
<input type="reset">
<input type="search">
<input type="tel">
<input type="time">
<input type="url">
<input type="week">
credit w3schools.com
Basic Syntaxes For Creating HTML Forms
Below are some elements for creating different components in an HTML form.
<form></form>
This element creates a container for your HTML form. All of the components in your form should go inside this element. It makes it easy for you to validate a form before submission and send a user’s submission back to the database.
<fieldset></fieldset>
There are some situations when you have to create different sections in your HTML form. For instance, in one HTML form, you could have a personal information section and an education history section. Fieldset makes it possible for you to split your form into different sections.
<legend></legend>
Legend is a semantic element for giving your fieldsets a title.
<label></label>
The label is a form element used to give each of your HTML inputs a title. It makes it easy for you to give a descriptive label for your user to know what an input category is for.
<input><input/>
Input is a self-closing element. It goes into your form container. Some of the different input types have been discussed in the previous section.
<select></select>
Select element is used to create a dropdown menu where users can choose one or more out of available options.
<option></option>
To create the options available in your dropdown menu, you use the option element. Each of the available choices will be put in different option tags, while the option tags are enclosed within the select element.
<button></button>
This creates a clickable button. It is similar to creating a button using <input type=’submit’/>. It is advised that you create a button using this element, as it is more semantically accurate.
Creating A Simple HTML Form
To put all we have discussed so far into practise, we will create a simple HTML form.
Start by choosing a code editor you’re comfortable with.
Declare your HTML document type and write meta tags appropriately.
    <!DOCTYPE html>
    <html lang="en_US">
       <head>
         <title>forms</title>
          <meta name="viewpoint" content="width=device-width, initial-scale= 1">
          <meta charset="UTS_8">
         </head>
         <body>

         </body>
         </html>
- Use the
<form>tag to create a container for your form.
     <!DOCTYPE html>
     <html lang="en_US">
       <head>
        <title>form</title>
        <meta name="viewpoint" content="width=device-width, initial-scale= 1">
        <meta charset="UTS_8">
       </head>
       <body>
         <form>
         </form>
       </body>
      </html>
Use the tag to create a label for your form. For instance,”first name”,”surname”. A “for” attribute should be included in the label tag. The value given to the “for” attribute must match the value given to the “id” in the input tag. This serves as a method for linking the label to the input.
   <!DOCTYPE html>
   <html lang="en_US">
     <head>
      <title>form</title>
      <meta name="viewpoint" content="width=device-width, initial-scale= 1">
      <meta charset="UTS_8">
     </head>
     <body>
       <form>
        <label for="firstname">First Name:</label>
       </form>
     </body>
    </html>
Create an
<input>tag inside the<form>tag(container).When creating the input tag you include:
- A “type”,which specifies the type of input it would contain(text,radio button,checkbox,submit,button e.t.c)
- An “id”,which is used as a unique identifier for the input.
- A “name”_to specify the name of your form.
- A “placeholder” which is the default display on the form when no input has been made.
       <!DOCTYPE html>
         <html lang="en_US">
           <head>
             <title>form</title>
             <meta name="viewpoint" content="width=device-width, initial-scale= 1">
             <meta charset="UTS_8">
           </head>
           <body>
            <form>
             <label for="firstname">First name:</label><br>
             <input type="text" id="firstname" name="firstname" placeholder="Oluwatobi">
              <br><br>
             <label >First name:</label><br>
           </form>
          </body>
         </html>
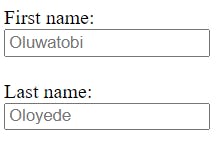
Let's create a form with two inputs_First name and Last name.
<!DOCTYPE html>
     <html lang="en_US">
       <head>
        <title>form</title>
        <meta name="viewpoint" content="width=device-width, initial-scale= 1">
        <meta charset="UTS_8">
       </head>
       <body>
         <form>
          <label for="firstname">First name:</label><br>
          <input type="text" id="firstname" name="firstname" placeholder="Oluwatobi">
              <br><br>
          <label for="lastname">Last name:</label><br>
           <input type="text" id="lastname" name="lastname" placeholder="Oloyede">
         </form>
       </body>
     </html>
The image below shows the end result of the code when it is run.

References:
For further readings on the topic, here are some useful resources:
